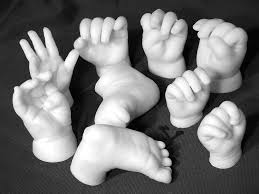
 Children are precious gifts that come to us and help us to become a complete family. Their entire life is something that we treasure, but we often put a lot more effort into creating memories of their first years. This is because, during a single year after birth, infants will change from 7lbs of weak little beings to 20 pounds of smiles and movement. In the years following, they will continue to grow and learn a little each day. A moment missed is a moment that we will never get to see again. For new parents, in order to remember that tiny foot that is no bigger than a finger, casting baby hands and feet is becoming very popular.
Why Casting Makes Outstanding Keepsakes
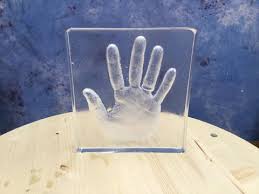
 When you cast a tiny hand or a tiny footprint, you can keep that print until the end of time, no matter how large your little one becomes. It becomes a treasure and a keepsake that you can hang on the wall or leave sitting on your desk at work to remind yourself of how tiny your baby was when they came home from the hospital. It will also be something that your baby will enjoy when they are older. They will like seeing how tiny their own hand was once upon a time and may even show it to their own children when they are big enough. If you are interested in learning how to cast your own sweet memory, you first need to understand how to make resin molds when casting.
Creating a Perfect Cast
In the beginning, the only way to really cast a baby’s prints was to use plaster and keep the plaster forever. It was effective, but they can become broken. This is why some parents now choose to explore resin molds.
To start, you will need to find a molding powder that is safe for your baby. There are many non-toxic, non-allergenic options available. Often, you will only need to mix the molding powder with water in a container that is large enough for their small hand or foot to rest in. For some babies, it is easiest to do when they are in a deep sleep, but perhaps still being held by you or your partner. They may wiggle some, but will usually calm down quickly and then in about 75 seconds you can remove their hand or foot from the mixture. Remove it carefully and do not worry if you have to wiggle their hand or foot a little. Your baby will not get stuck in it.
You should let that mixture firm over a couple of hours to ensure that the casting mixture or resin will not mess up the mold. Some people also recommend that you spray Pam or coat the inside with powder so that it will not stick to hard inside the mold.
If you are using casting stone, you should allow it to dry for two hours before removing the statue. If you are using epoxy or other plaster types, you may need to let it cure for up to 24 hours before attempting to remove it from the mold.
Things to Keep In Mind While Casting
Be advised, you will most likely have to destroy the mold. Therefore, if it does not turn out the way you want, you will have to start from scratch. For this reason, many people also opt to press the baby’s hand or foot onto a tin that is filled with the molding powder mixture. Then, you can ensure that their fingers do not wiggle much during the hardening process. However, when it comes to the epoxy pour, you will not end up with a 3-D statue casting.